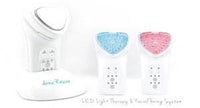
LED Light Therapy
Light Therapy for Skin Conditions
Light therapy uses wavelengths of light to encourage regeneration with new energy. It harnesses the power of light to improve the appearance of your skin. These wavelengths can penetrate deep into the skin with stunning results. Red LED light therapy is anti-aging. It stimulates the production of collagen. Additionally, blue light remedies acne-causing bacteria. As a result, your complexion and overall tone are improved.
Light therapy is an excellent replacement for expensive, dangerous surgery and laser treatments. Our red and blue light treatments can now be used at home to help achieve even, healthy, smooth skin.
How It Works: Fighting Acne
Blue light is emitted into the skin at 430nm. They penetrate below the surface of the skin, where bacteria lurk. Blue Light gets rid of bacteria. It is best to use the LED light twice daily when fighting breakouts. Bacteria reproduce every 12 hours. Blue light therapy is a long-time favorite of dermatologists because it works!
How It Works: Anti-Aging
At 632nm, red light travels into the under-layers of skin, stimulating cells to produce more collagen. Red light fights the signs of aging. When more collagen is produced, your skin returns to the healthy glow you once had as a youth. Fine lines and wrinkles diminish, and skin appears plumper.

The Benefits of Light Therapy:
- Encourages skin regeneration with new energy
- Penetrates deep into the skin for stunning results
- Red LED light therapy stimulates collagen production for anti-aging
- Blue light therapy eliminates acne-causing bacteria for an improved complexion
Video Transcription
Hi, and welcome to Skin Perfection's "How To" video series. I'm here to introduce to you the Derma Rescue. This is going to nourish, sculpt and lift your face. And you can get that youthful-looking, fresh glow you've always been wanting.
So we're going to start with a titanium head, here - it's the metal-looking one. We're going to put it down until we hear a click motion. Then we're going to see the on/off. You're going to hold that down for two seconds until you hear that beep.
Step One - Cleanse
The first one we're going to do is cleanse. So you're going to click this once. And then there is going to be a low, medium, and high. I like to go on medium, but you can do whatever you like! So you're just going to click that one time to bring it over to the medium.
You're going to put your favorite gel on your face, and then you're going to simply put this up but in circular lifting motions.
You're going to do this for four minutes, and it's actually going to beep, which lets you know that it's finished. And that's all you're going to do for step one.
Step Two - Nourish
Now for step two, we're going to take our sander or rescue with the titanium head. And the second one down, we're going to click the second one, so nourish.
The third one down, you're going to click it on whatever you want - I like the medium. And then you're going to take your favorite Skin Perfection serum. If you're trying to get rid of those fine lines and wrinkles, you want to choose them specifically for that.
So you're going to put it all over your face, and then you're going to take your Derma Rescue and put it on your face, and do the circular uplifting motions.
You're going to do this for four minutes until you hear that beep. And then you're going to continue to step three.
Step Three - Lift
Now for step three, you're going to keep your same Skin Perfection serum already on your face. You're going to take your Derma Rescue with your titanium head, and you're going to click it over two times until you see the lift.
Then on the third one down, you can do whatever you like. As I said, I like the medium. Then you're going to put it to your face and do the circular uplifting motions for four minutes until you hear a beep.
Next, we're going to go into light therapy.
Step Four - Blue Light Therapy: Clarify
Now we're going to move on to the Blue Light Therapy.
So you're going to grab your head that has a little "B" at the back. "B" for Blue Light Therapy.
You're going to grab your Derma Rescue and push it in until you hear that click. You're going to turn it on, and then the very top right button, you're just going to simply click that. You don't even need to worry about the last parts.
Once you do that, it's not going to turn on until it actually makes skin contact. Once it does, it's going to then light up.
So what you're going to do is you're going to split your face into six sections. So one, two, three, four, five, six - imaginary sections. And I like to start at the very bottom right and just kind of work my way around each section. We'll go for three minutes.
After you're finished with one section, the Derma Rescue will make that little beep, and it'll tell you to go to the next section. This is really to clarify your skin. You're going to get rid of any scars and any blemishes.
Once you're finished with this, you're going to move on to the Red Light Therapy.
Step Five - Red Light Therapy: Sculpt
So for the final step of your Derma Rescue, you're going to simply take off the last head by clicking down on this. It's going to simply slide off. And then you're going to grab your "R". "R" for Red Light Therapy.
You're going to slide it in. You're going to make sure it's on, and then you're going to click the top right button here. You don't need to worry about the bottom ones.
So, you're going to make sure your face is completely dry. And then, once again, it won't actually work until it makes skin contact.
You're going to again split your face into six different sections. I like to start on the right side. It's going to go for three minutes, for each part.
After you hear the beep, go to the next section until you finish all six sections.
Conclusion
That concludes all the steps for our Derma Rescue "How-to" video series. If you have further questions, just refer to the instruction sheet that will come with your Derma Rescue in the mail.
I hope that you enjoy the beautiful effects the Derma Rescue has on your skin!


